

Printing objects with parts that need support is inevitable when you get into 3D printing. Usually the first thing which comes to mind to achieve a successful print is adding supports in your slicer software. But do you always need them or is there another way? What if “bridging the gap” is possible without supports? Could you save time and materials by not having to print those supports? That is what we are going to explore with Simplify3D.
Things You May Need:
Here is a list of items you may need if you wish to follow along:
- Simplify3D slicer – This is a probably one of the best slicers out there.
- The 3D model we are using as our test example, a really awesome 3D printed engine by Depronized available for download at Thingiverse.com
- Some PLA filament of course!
“Bridging the gap”
What exactly is “Bridging”? One definition of bridging is “an extrusion of material that horizontally links two raised points”(without the need for supports). This almost sounds like defying gravity, so how is this possible? All3DP does a great job of explaining how to test your printers bridging capabilities that you may not have known it already has. There is even a test print you can download from Thingiverse.com to test your printer .
But what we would like to show you is a somewhat “hidden gem” of a feature Simplify 3D has in it, to help you easily determine if your slicer will be interpreting where it needs to be bridging the gap for parts of your print.
“Standard” Supports
As previously said, most of the time when you drop a part on your slicers build plate, you think you need to add supports to get it to print correctly, like this using Simplify3D’s auto generate support feature:

If we look at a cross section of the train body, you can see that quite a few supports will be generated:

If we were to print this with the supports, this is how much filament would be required using a modest amount of infill:

But if we were able to turn off supports, it would only take this much:

And we would save time!
Saving filament and Bridging the Gap
Now let’s turn off those supports and find Simply3D’s bridging hidden gems. You have probably not even noticed it (like we did not). You can find the first one in the print preview screen. Normally when you enter this screen, by default, it looks like this showing you the travel speeds:

However, take a close look at the drop down menu at the left. There is an option called “Feature Type”:

If you select this option, instead of showing the travel speeds, Simplify3D will display an entirely different set of visuals:

The “feature” we are interested in seeing is “bridging”:

You will now be able to see, if, with the way you have your slicer options set, Simplify3d will bridge all of the gaps you want or not. In the case of our test engine, we can see that the front of the engine will definitely get “bridged”:

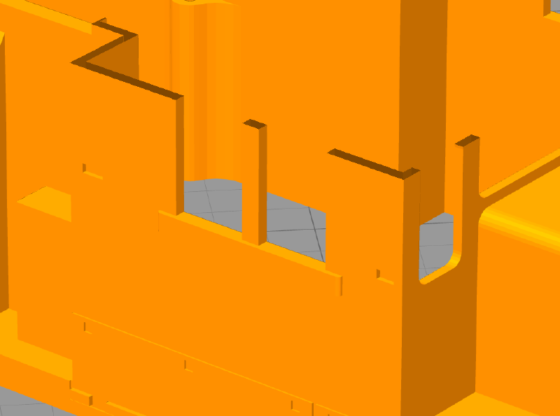
However, the windows are being missed:

So how do we adjust the slicer to do this? The answer is in a settings of the process.

If you open the process by selecting “Edit Process”, you will find the bridging setting under the “Other” tab:

If you take a look at these settings located in the upper left of the tab, you will likely find that the checkbox “Apply bridging settings to perimeters” is unchecked:

Simplify3D covers these settings very well and you can read about all of them starting here . But getting the bridging you want may be as simple as checking this box:

Save the changes in the process and slice the object again. In the preview mode, look what the slicer now shows:


Bridging will now take place! The results?


We hope you enjoyed this article on “Bridging the Gap”. If you enjoyed this article, check out our other tips, such as the makers guide on resizing an object with 3D Builder.